Welcome to Sydney Voice Reels, a simple way to get started in the voice over industry. Aside from producing affordable, professional voice demos, I also love writing about voice over work. Here are my articles on voice over, so enjoy!
I get lots of enquiries from people wanting to break into the voice over industry. And I am always shocked that people think voice over is something that you can just simply walk into, without any previous training. I have been working with voice actors for many years and over that time I have come to appreciate more and more the craft of these amazing performers. Bringing a voice over script to life isn’t easy. You have to have range, flexibility and an incredible understanding of text. This takes work and training. The problem is finding a great voice over class here in Sydney can be tricky. There are a lot of options and they can be expensive!
So what are the best training courses for voice over? Well I have listed the what I think are the best options in this article. I wanted to put together a list of the best voice over classes in Sydney to help you find something appropriate.
Best Voice Classes in Sydney
#1 Private Coach
OK, so this isn’t really a course, but I think a great option. If you can find someone who is in the industry that can take you on as a private student that is invaluable. You need as much time in front of the microphone as possible.
NIDA is one of Australia’s premier training facilities for performers. They offer a few options for voice over classes. Definitely a safe option, though sometimes they can feel a bit corporate and lack that personal touch.
Another academy offering voice over classes is AFTRS. It’s a great school and all their courses are fantastic. That said, they do come with a hefty price tag and a lack of one on one feedback. If you really don’t know where to start this could be a great option.
#5 Voice Booth
Voice booth are a local company that runs a 6 Week course every few months. They attract a lot of students and could be a good option to look at. The class sizes can be big, around 10-12 people, so you won’t get a lot of time on the microphone, but they get some great tutors to teach during the course. This is also quite an affordable option.
# 6 Online Teachers
I’ve mentioned a few times the value of getting in front of that microphone, but sometimes you just need to learn technique. If you just want to learn more about the business and get some hints and tips, there are some great online teachers. Notable mention: Bill DeWees
There are also plenty of great online teachers online: VO BUZZ WEEKLY are great, as well as BOOTH JUNKIE. Youtube is an awesome place to learn more about voice over, but also a mine field. Make sure you are only taking advice form the reputable players. A lot of hacks out there!
#6 StageMilk Voice Over Class
Lucky last! And yes, this is my own course. But well it’s my site, so I can do what I want. Recently I teamed up with Dorje Swallow, one of Australia’s leading voice overs, to make a 4 week course to help actors get into the industry. Dorje is with RMK Voices, the leading voice over agent and has worked consistently in the industry for the last 12 years. So far students are loving it. Our point of difference is that you get loads of time working in front of the microphone. As we only take on 4 students, each class you will get lots of practical experience working in the studio. It’s a four week voice over class based in my Studio in St Peters. Unlike other classes that usually just focus on exercises in a rehearsal room, we spend every class in a professional studio. If you are keen, or want to learn more, get in touch via email sydneyvoicereels@gmail.com
Conclusion
So what is the best Sydney voice over class? Well it depends what you are looking for. I recommend contacting all your options and working out which one feels like the right fit for you. Remember that you don’t want to spend a fortune when you are starting out. The key is to get some experience, see if it’s for you and build from there. Good Luck!
So you love funny voices? So do I. I love them so much I’m not sure what my real voice is anymore! Most voice over actors focus their attention on making a great commercial reel, and that’s obviously important, but for some, it’s the character work that they really want to do.
If you want to get into character work, anything from animation to video games, you need a character reel. If you are an actor in Sydney it can be hard to know where to take the next step. There are a few studios that do reels but you’ll be lucky to spend less than a $1000. That’s why I am now offering affordable character reels.
To chat further about creating an outstanding character reel, shoot me an email: sydneyvoicereels@gmail.com
Before I tell you more about what I’m offering, here’s some common questions I receive about character reels…
Can I just use one voice demo for commercial and character work?
No. This simply isn’t done in the industry. You want to keep each reel separate. Sometimes in Australia voice over actors add a few more extreme ads or “silly” voices into their commercial reels, but generally it’s confusing.
If you want to work as a character voice actor you need to have a dedicated demo reel that showcases your versatility, tone and creativity.
How long should a character reel be?
I wouldn’t recommend going past 1.30. In the US they recommend keeping it to a minute at most. Here in a Australia the rules aren’t so rigid. Many voice over actors just glue together all their professional work and sometimes it gets to over 3 minutes. It can be worthwhile having one long compilation, but for most situations listeners are going to switch off after 30 seconds. If you are producing from scratch I would stick to 1.30 which is around 5-7 characters.
What do I include in a character reel?
A character reel is where you show off your imagination. It’s not about imitating well known voices. Someone is already the voice for Bart Simpson, so you can leave that off your character reel. Mimicry is a great skill, but it won’t help you get a gig. Work on some characters that are vocally interesting and unique. You want range in the reel, but also you want to show your strengths. Chose characters that you know you can nail on the day.
Ok, so I want to record a character reel!
Great. I’m here to help. I am now offering fully produced character reels for a fraction of the price of other studios. Which means that you can take the plunge without spending a fortune. So if you have the passion, but you don’t yet have representation or many industry connections this is a great starting point.
So you’re looking for a voice actor for your next project. Well if you’re looking for a local Sydney voice actor you’ve come to the right place. I’m Andrew, an independent audio producer based in central Sydney. I am working with voice over actors everyday, either producing voice demos or recording commercials for companies just like yourself.
Chances are if you’ve stumbled on this page, you are looking for a new voice over without the hassle of agents, recording studios, producers and all those other steps typically involved in producing a great affordable voice over.
I will go into more details below about the services I offer, but if you’re keen to discuss your next project send me an email right away:
sydneyvoicereels@gmail.com
Let us know a little about the project, budget and time frame. We will get back to you straight away with a quote.
What is Sydney Voice Reels
Sydney Voice Reels is an audio production company. Our core business is producing high quality voice reels for actors and voice over artists. In doing this we are interacting with great up and coming voice over artists everyday. The natural next step was to branch out into voice over production. With an industry standard voice over studio and access to some of the best up and coming voice talent in Sydney, we can help bring your next project to life for an affordable price.
Sydney Voice Over Actors
We have voice over actors to suit any project. Whether you are after a young teen voice, or a classic older Australian male we can help you get sorted. Below are just a few of the incredible Sydney voice artists that we work with at Sydney Voice Reels:
Patrick Cullen
Felix Gentle
Freya Benjamin
Luke McMahon
Affordable Sydney Voice Talents
As all our Voice Overs are done remotely we don’t have a lot of the overheads that most Sydney audio production companies have when dealing with voice over production.
Tell us about your project, and the kind of voice you would like. We sort out the rest!
We do offer services where the client can come along to the studio session. This is an added cost, but it can be important for certain projects.
If you’re looking for a Sydney Voice Actor
If you are looking for a Sydney actor, you’ve come to the right place. All our voice over actors are experienced, well trained and professional voice artists. We pride ourselves on flexibility. If you’re not happy with the recording, we work with you to make sure you have an end product you’re happy with.
Where to find Voice Actors in Sydney?
Finding voice actors here in Sydney can be tough. The industry is dominated by the major voice agents, and outside of those, you are stuck with a myriad of production companies and independent voice over artists. It can often be hard to discern who can be trusted.
As you can hear from the production of our reels and the quality of the voice over talents listed, we are one Sydney based audio production company that you can turn to.
We pride ourselves on creating affordable, professional voice overs that fit your budget and time constraints.
NEXT STEP…
Get in touch via email about your project: sydneyvoicereels@gmail.com
We make sure we get back to every enquiry as quickly as possible so we can help bring your project to life. I look forward to working with you very soon.
So you find yourself wanting to loop an audio file in Pro Tools and even though you Loop play enabled the audio selection doesn’t seem to be looping. I created a really short video to help you solve the problem:
Loop Playback Not Working Tutorial
Basically you can’t have Quick/Punch switched on and have a track armed. You have have to make sure either Quick/Punch is switched off, or you have no tracks record enabled. Once this has been done you should be able to loop until your hearts content.
You may also be trying to loop a selection that is too short. The limitation on Pro Tools is under half a second, or 500ms. I don’t know why anyone would do this, but it is worth noting.
I hope that helps! I will be coming out with plenty more Pro Tools tutorials over the next few months so Subscribe to my Youtube channel to stay updated.
When I started recording voice demos full time, I knew I needed to step up from my much loved Rode K2 and Rode NT1-A. I loved these microphones, but I felt I needed to keep up with industry standards and buy one of the classic voice over microphones. My choice was between the Neumann TLM 103 and the Sennheiser MKH 416 (I now have both!).
I chose the Neumann because I knew it would be so versatile. I was used to working with large condenser microphones and had researched a great deal about the clarity and precision of the Neumann, as well as the extremely low self noise (the noise a microphone makes when recording, which is especially important for voice over).
I’m so glad I purchased this microphone and wanted to list some of the reasons why it’s a great microphone for voice over work.
Why the Neumann TLM 103 is Great for Voice Over
#1 Self Noise
The mic has very low self-noise, and is very sensitive, making it ideal for voice over. It’s self noise is 7 dB-A. This is one of the quietest microphones on the market. It’s even quieter than the world famous Neumann U87 or the industry standard Sennheiser MKH 416. This low self noise means you can record long stretches of narration without any low hum or hiss that is more prevalent in microphones like the Rode K2 or other cheaper microphones.
#2 Durability
Neumann are famous for their build quality. They are a premium brand and typically only make much more expensive microphones. This microphone is made in Germany, and just holding it you can feel the quality.
#3 Compact
The TLM 103 is a cute little microphone. It has a bit of weight, around 450g, but it’s very compact. It also doesn’t require any external power so you can simply plug in and you’re good to go. (Assuming you have phantom power)
#4 Clarity
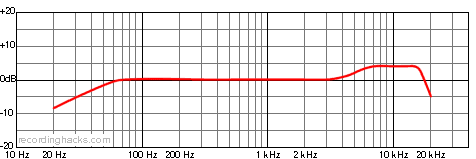
This microphone is well known for its clarity. It has a broad 4db presence boost around 5k (as you can see below). Some audio producer don’t like the microphone for this reason, calling it “too bright”. However, for voice over this clarity really helps. It also doesn’t compromise the low frequencies which are fantastic and full bodied on this microphone.
#5 Reputation
When you’re working in voice over, people recognise names. If you are starting a home studio and looking to impress on your gear list, a TLM 103 is a solid choice. If you look at the profiles of most home voice over studios online (especially on Voices.com) you will see just how common this microphone is.
It’s also used by Bill Dewees, and Booth Junkie, two very well known voice over artists.
Conclusion
The Neumann TLM 103 is a beautiful microphone. It’s not cheap, and probably a bit out of the range of most home enthusiasts, but if you are keen to take your voice over to the next level it’s definitely a great purchase. If you are just starting out I would look at the Rode NT1 as a fantastic budget option.
The Rode NT1-A was the first serious microphone I bought for my home studio over 10 years ago. My local music shop recommended the mic, and after some half hearted Googling I decided to give it a go. To put it plainly, I fell in love with the microphone. I was mainly recording music at the time, and the microphone was incredible. Regardless of what I threw at it, acoustic guitar, screaming vocals, it just sounded good. It’s versatile, warm and clear. So why buy the Rode NT1-A for voice over?
Note: the Rode NT1 and NT1- A are slightly different microphones but both are awesome. According to Booth Junkie (See video below) he prefers the NT1. It’s got a flatter frequency response, and so I would agree that would be the way to go. However, this review is of my experience with the NT1-A.
Since my humble home studio beginnings I have purchased many other microphones including the Rode K2, the NT1’s big uncle, the Sennheiser MKH416, the beautiful Neumann TLM 103 and the Rode M3, as well as other microphones. I started doing voice over sessions with the K2 and loved it. It’s a valve microphone so it’s lovely and warm. One day the K2 had enough and the valve blew, I was forced to go back to my trusty Rode NT1-A. I was worried as it’s just an inexpensive microphone, but the session was great. Afterwards I was searching online and found out that many voice over actors use this microphone.
Here’s the difference between the Rode NT1 and NT1A
Why is the Rode NT1-A great for voice over ?
#1 Cost
First of all the Rode NT1-A is crazy cheap. Like insane. If you are on a budget please go and buy this microphone. Especially for a home studio it’s more than enough. For a mic this versatile, and professional, I wouldn’t recommend anything else.
#2 Clarity
The Rode NT1-A is a beautifully clear microphone. Some might even call it too bright, but for voice over that clarity is great, especially when you don’t have a lot of other external preamps and compressors, or expensive plugins to help you out. If you would prefer a flatter more balanced sound the NT1 would be the better option.
Rode NT1-A and NT1 Frequency Response
Both versions of the mic add a bit of brightness and clarity in highs.
#3 Solid Build
Rode just make great microphones. They are such a solid company and most their products come with a 10 year warranty. How many companies are offering 10 year warranties? That’s because their products are really well made. Even though they are affordable, they are one of the most trustworthy audio brands out there.
#4 Low self noise
The Rode NT1 is one of the most quiet cardioid microphones on the market. Quieter than the much esteemed Neumann TLM 103 or U87 and much quieter than the Senheiser MKH416. Having a quiet microphone is vital for voice over, especially when working on narration or other voice over work that won’t have SFX in the final product.
1) Large 1″ condenser capsule with gold-plated membrane
2) Polar Pattern: Cardioid polar pattern
3) Ultra-low noise, self noise of 4.5dB
4) 10 year extended warranty when you
I have loved my Rode NT1-A and would recommend it to everyone as a great starting point for voice over. The Rode NT1 would be an even better choice if you can spend the extra few bucks, but you’ll be happy either way.
I’ve been fortunate enough to work with a number of different voice over artists. One thing I’ve noticed is that whether I am working with a professional voice over actor or someone who is just starting out, everyone benefits from a solid voice warm up.
The best voice over artists always do a voice warm up before a session. Even if it’s only 5 minutes they understand that getting their instrument ready will not only help nail the job, it will get them re-employed. That extra 5 -10 minutes work could help you land the gig, or get reemployed if it’s a paid session. It’s also very important if you’re doing a voice demo session. You’re spending the big bucks on a new demo, it’s crazy not to warm up.
There are a number of elements to any voice warm up, but I just want to cover the ones I feel are most important for voice over.
Voice Warm up for Voice Over Actor
Alignment
This is the foundation of all voice over acting. If you are starting a session in poor alignment, your voice won’t be at its best. Being aligned and centred will solve many of the common vocal issues voice over artists face.
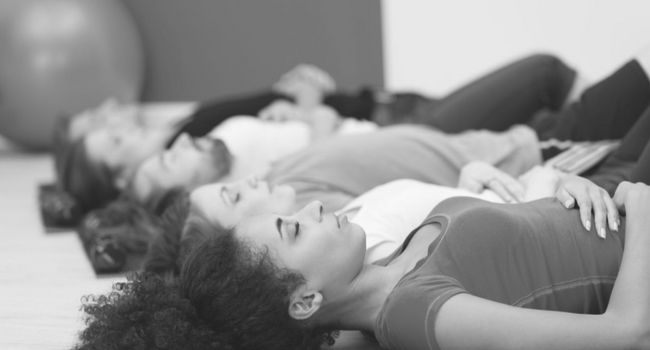
#1 Semi-supine (Image below)
Semi supine is the best exercise I learned at drama school. Simply, it’s a position that completely takes the pressure off your spine. As you can see from the image below, the spine is able to be fully in contact with the floor. 15 minutes in this position is equivalent to 6 hours of sleep. Doing this for 10-15 minutes before a session is a great way to reduce tension, and realign your body.
You can also do many vocal exercises in this position. As you can see a small book under your head really helps, but isn’t essential.
#2 Tension Release
Alignment is impeded by tension. These can be fleeting tensions, or life long tensions, but either way you want to work to lessen their effect.
The jaw is a problematic area for many people. Lightly massage your jaw (externally). Draw your hands from your temples down along your jaw and release all that tension. The muscles just below your cheek bones can also get very tight, massage the whole area. Massaging your temples, shoulders and face can also be a great release.
Support
Breath support is the foundation of all voice work. Though you might be sitting in a chair reading 2 lines, voice over work can still be taxing, trust me! So make sure you do some work to get connected to your breath:
#1 Stretch your ribs
Your ribs are the key to your breath. First of all stand up tall with your legs spread wide. Then with your left arm reach over to your right side of your body and stretch out your left ribs. Your other arm should hang down. Do three deep breaths in this position. Then do the same on the other side. Very simple way to open up the rips. Adding in a yawn or a hum can also help.
#2 Fricatives
Funny word isn’t it – fricatives. These sounds include “FF, SH, SS, TH”. They are unvoiced sounds that you can use to lock in with your breath.
Stand in alignment, feet are shoulder width apart, and make any of the above sounds. Once you are out of breath, relax and let the air flood into your lungs. Never try to control your in breath, just let it be. Do three sets of each fricative. You can do this exercise in the semi-supine position (mentioned above) or on all fours.
This seems almost too simple, but it will connect you to your breath and get you on support for your voice over session.
Resonance
Resonance is so important for voice over. The more rich and resonant your voice, the more the microphone will love you.
#1 Humming
Humming is the classic voice trick. If you only have a few minutes, humming is your best bet. You can also add in some light scales on a hum or sirens (below), but any sort of humming will be great.
#2 Resonance Scan
Start humming. Feel where the vibration is in your body, usually it’s strongest around the throat. Now try to move that vibration around your body. Place your hand on the top of your head and see if you can get it vibrating. Then the face, especially the nose. Then throat, chest, and rips. Sending resonance to different parts of your body is a great way to find more room to resonant.
If you resonant, you will resonant with the listener.
Articulation
This is the biggest problem area I find with voice over artists I am working with. Making sure you are articulating properly will be hugely helpful in a voice over session.
#1 Word Jumble
Talk absolute gibberish for 20 seconds. Try to say every single consonant you can and as quickly as you can. Then stop and talk normally. You should instantly feel an improvement. Go again and try to say even more consonants, and quicker than the first time.
#2 Massage
This can get a bit messy, but it works. Massage your cheeks and lips. And yes I mean get in your mouth (preferably with clean hands) and loosen up your articulators. This is best done with your thumb and forefinger working along each cheek and around the lips.
#3 Articulation exercises
Find 2 or 3 tongue twisters that you like and say them as clearly as you can. Remember you need to remember all the previous steps in this warm up before doing this work. It’s no use just rattling off a few tongue twisters slouched on a chair.
A few classics…
Unique New York
New York Unique
She sells seashells by the seashore
Eleven benevolent elephants
Range
Voice over directors are going to push your voice. They expect voice over actors too have an incredibly flexible voice. Therefore working on your range is vital.
#1 Sirens
The title says it all. Take your voice from its lowest point to highest (pitch wise) and back again on a soft hum. You can also do this on a lip trill, or an open vowel: ah, oo, ee.
#2 Scales
There is nothing better than a singing warm up for your voice, and singing voice warm ups revolve around scales. Find a few scales (Spotify has plenty of free playlists) and gently work through them on a hum, and then a “la”. This will help improve your range. I like a basic 5 note major scale.
Conclusion
It doesn’t take much to get your voice in a great state for a voice over session. If you are regularly warming up and working on your voice, it should just be a small part of your morning routine. I hope some of these exercises help you smash your next voice over session.
If you’ve come to this site before, chances are you’ve heard me harping on about the value of a great voice over demo. It’s your ticket to booking that audition, and hopefully job. So what makes a great voice over demo? I’m still fairly new to the voice over game, but I’ve already learnt a lot about what I think makes a great voice reel. Hope you enjoy…
What type of voice reel are you making?
Before we get started it’s important to note that there are a few different types of voice reels, and it’s always good to keep them separate. This article is discussing a commercial demo – a collection of commercial spots (7- 30 seconds each) combined together into a reel around 1-3 minutes in length. (1.30 minute max for those starting out).
Commercial Demo – This is what this article is about. Character Demo – funny voices, interesting characters Promo Demo – stingers and short promos (TV, Film etc)
We will go into the other types over the next few weeks. The commercial demo is the most common and unless you are trying to get into character voice overs, I would start with a commercial reel.
#1 You
I work with agencies all the time and the biggest thing I’m asked to do when I’m recording a new voice reel for an actor, is to make it natural. To get their “real” voice.
Most of the jobs you will be going for in the real world will be based around your natural voice. Voice actors typically fall into brackets, like with acting. You might have a higher voice and fall into the teenage/young adult category, or you might have natural low and resonant voice and will lean towards roles like “annoucer” or “blokey”. Whichever casting you may fall into should be based on your natural voice, not a forced voice.
You will of course become more versatile as time goes on, but to begin with, it’s best to play to your strengths.
Always have a good number of spots on your reel that are casual and based around your natural voice. This doesn’t mean they are low energy or monotonous (that’s not what we want), but don’t go smashing out a bunch of accents and voices that aren’t likely to be your casting.
#2 Variety
So I’ve just been rambling on about being you, and now I’m talking variety… Whaaa? Even within your natural voice you can find a lot of range and variety. Look for dynamic, intensity and emotion.
Great to always have a hard sell (strong very classic advert style), soft sell (easy going friendly advert), something friendly, something sentimental such as a charity ad, something with a bit of pace, something funny.
Tip: people always forget that they are funny when they are making their voice reels.
Tip: getting variety starts with having some awesome copy for your reel. Check out voice over scripts to start getting a great reel planned.
#3 Emotion
Emotion sells. Actors often forget to find the emotion or the soul in the ads. And I get it, it sounds evil. Using your acting chops to sell products. But you have to use your emotional range.
If an advert is appealing to a listeners compasion you have to appeal. You have to find that emotion.
If you are trying to sell a mobile phone, and it’s fun and exciting ad, you need to excite the listener.
This can be tough. What I recommend is to remember that voice acting is acting! If you need to find joy for an advert put on a great big smile. Sounds silly, but you can hear that smile in the recording.
#4 Clarity
Your voice sounds great, you’ve nailed the script, you’ve found the emotion, but if you can’t be understood, your reel falls flat. Always do some vocal warm ups before any voice over work, focusing on articulation.
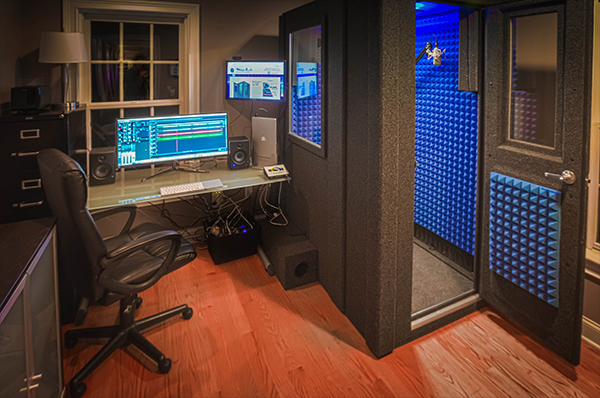
So you’re cottoning on to how fun, lucrative and flexible voice work is, and you want to get on the gravy train before it’s too late. However, you’re not sure where to start… Well luckily for you, I’m here to help. It all begins by setting up your basic voice over studio.
By the end of this article you will have a clear idea of how to set up a home studio for voice over and everything you need to get started as a voice over artist from your your bedroom/spare room/office/bathroom (wouldn’t recommend it).
I’ve broken this page into the seven core elements that make up a modern home voice over studio. The first five are the essentials and the last two are for that extra edge.
The essential elements of a home voice over studio
#1 Computer
You’re home studio begins with a computer. Audio software and audio recording, used to destroy computers, but these days the strain on computers is less. That means most decent computers can handle audio recording without much issue.
If you start getting into big production and working with lots of plugins and effects you may need an upgrade.
I have being using a Mac Book Pro for the last 5 years and it works really well. I prefer Macs, as they typically run smoother for audio work. They are also the only real option if you are using Logic (A DAW mentioned below), as well as certain interfaces (also mentioned below).
Tip: if you’re going to get serious about voice over, it’s worth having a dedicated, or semi dedicated, computer for audio. You don’t want a bunch of viruses slowing down and messing up your flow.
#2 DAW (Digital Work Station)
Once you have a computer you need a program to record your audio into. This is known as a digital work station. I go into the best DAW for voice over in another article but these are some of the most commonly used (in order of price).
A. Reaper. Many voice over artists swear by this very affordable voice over editing software. It’s simple to use, affordable and is basically built for voice over.
B. Adobe Audition. This is a much loved audio editing program, especially for those already editing video on Premiere Pro. Again it’s user friendly, reliable and a powerful DAW with plenty of built in plugins to get you started.
C. Logic. You don’t hear much about Logic in the voice over game, but Logic is a great DAW and super easy to use, especially for Mac lovers. It could be a great choice, if you dabble in music as well. I recommend avoiding Garage Band, the baby brother of Logic, altogether. Though you could get away with it for voice over, I’m just not a fan.
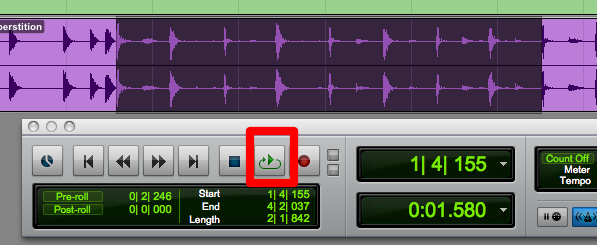
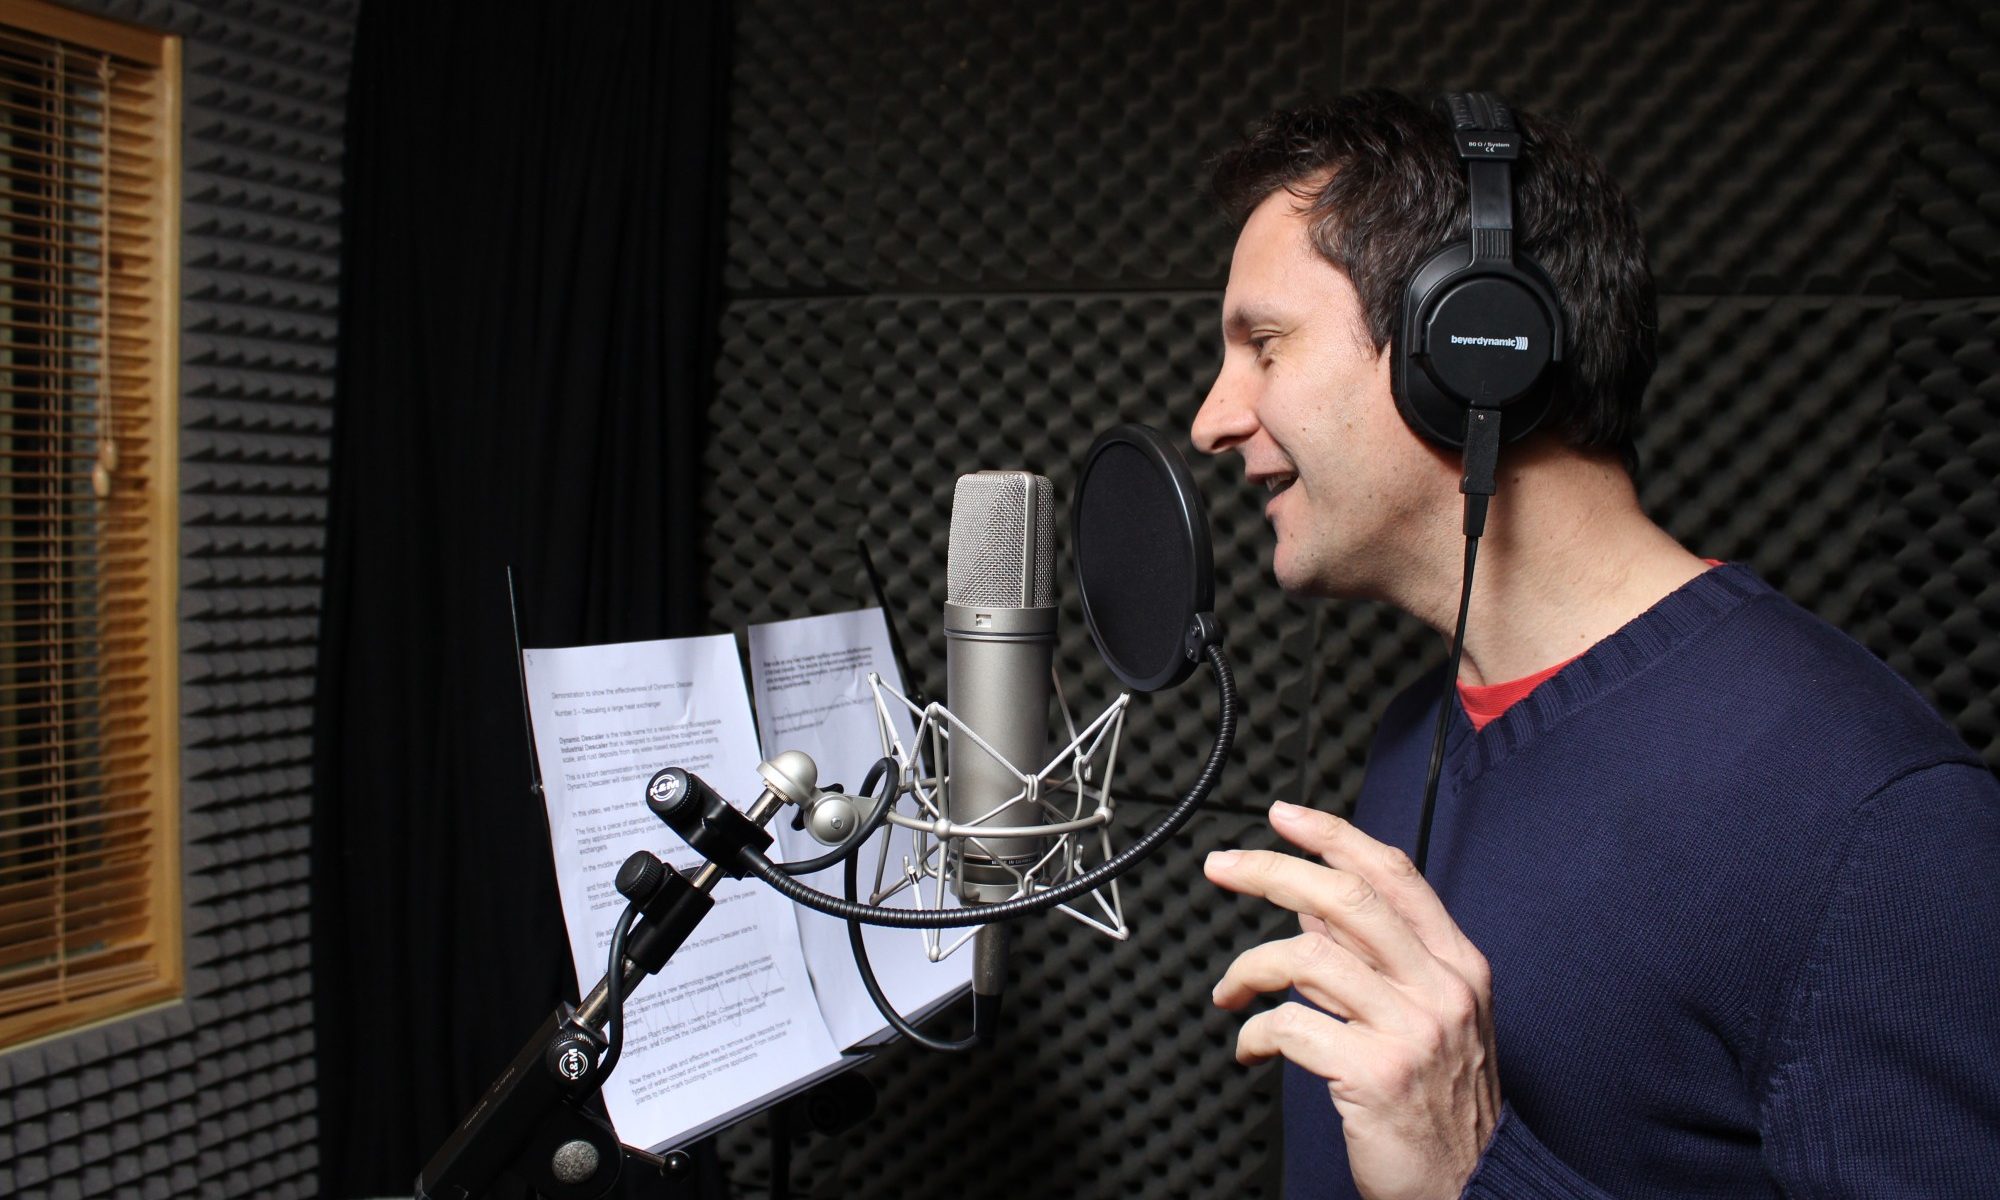
D. Pro Tools. Known as the industry standard in all audio production, Pro Tools is a a great DAW. It’s the program I use, and have been using for many years. Pro Tools is however expensive and can take some time getting used to. If you’re interested in production learning Pro Tools early could be a great investment, but it might be easier to on Reaper, or one of the more affordable programs.
Here’s the main man himself working on Pro Tools:
Tip: often your audio interface will come with free audio editing software. Sometimes it’s worth starting on these, and upgrading later. They are usually more than fine for voice over.
#3 Audio Interface
To be able to get your audio into a computer you need an audio interface. An interface converts the analog signal of a microphone or instrument DI into a digital signal. Having a quality interface with great analog to digital converters is vital for a great voice over recording.
Audio interfaces also have microphone pre amps which allow your microphone to be heard with clarity. Man of the stock preamps are more than adequate for a basic home setup.
I discus in more detail my favourite audio interfaces for voice over in another blog post, but here are some great go to interfaces to take a look at:
Note: as most voice over recordings are one mic, recorded in isolation, you don’t need to buy an interface with multiple mic inputs. This means you can focus on sound quality without spending a fortune on multiple channels.
#Option 1 Focusrite Scarlett 2i2 USB Audio Interface
This is one of the most commonly used interfaces for voice over. Focusrite are a trusted brand in audio, and this affordbale unit is fantastic. Clear mic preamps and everything you need to get started on your voice over work.
I’ve seen studios use this with very expensive microphones and not even use a mic pre amp (mentioned later) as the quality of this interface is enough.
#Option 2 Apogee Duet
Apogee is one of the most trusted brands in audio. They are especially well known for their analog to digital conversion and pristine mic preamps which are perfect for voice over. If you want to take your studio to the next step this is a great option.
This is the interface I’ve used for many years and I can’t recommend highly enough.
Note: Duets use break out cables which can be quite messy, this is my main issue with the unit. If you are looking for a slick product, and can afford it, the Apogee Quartet is an awesome purchase.
#Option 3 Universal Audio Apollo Twin
This is an incredible interface. Many project studios use this, and even professional recording studios. It’s a two channel interface, but can be expanded to have several more inputs.
This interface also gets you into the Universal Audio plugin world. UA plugins have a reputation as one of the best in the game. This means you can add beautiful compression and EQ to your tracks without having to buy additional plugins or hardware.
This would be the interface I would recommend if you can afford it. Beautiful piece of gear that will serve you for many years.
#4 Microphone
Your microphone will be the cornerstone of your studio. It’s the most important part of the home setup in most cases. When you are searching for a voice over mic you are looking for a few elements: clean and clear tone, low self noise (the noise all microphones emit), and body and warmth – particularly for male voice over.
I recently added an article on the best mircophones for voice over. It’s definitely worth checking out. In that article I mention the main different types of microphone for voice over: shotgun, condenser, and dynamic and which ones I would recommend for your budget.
If you have a reasonably well treated space I recommend investing in a great condenser mic, these are the most versatile and the place most new voice over actors start.
The most affordable would be the Rode NT1. This is brilliant microphone with very low self noise. After that I would jump up to either one of the bigger brothers such as the rode NTK or K2. The next step up would be the popular Neumann TLM 103.
If you want to go all out the two most converted microphones are the Neumann U87 and the Sennheiser MK 416.
# 5 Room Treatment
Like most audio engineers I’ve always been obsessed with buying gear. And especially microphones. But what most people skimp on, myself included, is acoustic treatment.
Creating a dead space. With voice over you want an extremely quiet space for your recording. You also want that space to be as dead as possible. By that I mean the reflections of sound in your space are at a minimum.
Sound travels. It bounces off walls and reflects. Big spaces with hard walls are the worse. That’s why recording a voice over in a cathedral would be a nightmare.
First of all picking a quiet room in your house is essential. Road noise, local kids in parks, birds, all these are very hard to remove from audio. The next step is to start absorbing some of the sound. Heavy blankets, acoustic panels, there are plenty of ways to do it, but you have to get serious about room treatment.
I will get an article up shortly on treating your home studio, but aim to make your space as dead as possible.
Next level voice over studio…
#6 Microphone Pre Amps
You can definitely be working as a voice over artist and making money without getting a designated microphone preamp. If you’re using a great audio interface such as the Apogee Duet, and a good mic, you will already be producing some great quality audio.
However, if you want to take your home set up to the next level, a designated preamp will give your mic, and your recordings, that buttery, rich texture that you just can’t produce with an interface preamp.
All the DAWs mentioned above have compressors and EQs as standard in their software. However, compression and EQ as external units can take your recordings to that next level.
Most audio engineers will talk with excitement about analog gear being far superior to digital. And I have to say they are mostly right. If you can get a great compressor and EQ on the way in, it will give your vocal recordings that spark.
One option is to buy a channel strip, this is usually a mic preamp, compressor and EQ in one. They cost a bucket load, but once you’ve got it, it should last you for many many years.
Conclusion
I hope there was some valuable information in there for you. Setting up a home studio is great fun, and a bit addictive. Remember that with any recording, even at Abbey Road Studios, the most important thing is the content – the source. You could easily make a great voice over recording with basic gear if the voice you’re working with is dynamic, resonant and engaging.
Make sure you are well warmed up and practicing your craft on the daily. Having a resonant and articulate voice is what will really make your voice overs sparkle.
In the world of music production, we often look for microphone preamps that add colour and excitement to a vocal recording. Often studios spend thousands on various unique preamps to give options when recording vocals. Words like “warm”, “buttery” and “coloured” are what is often sought after. However, in voice over we don’t necessarily want all that colour. We do want warmth and texture, but our core goal is to capture audio that is very clean. We want clarity, body, and a clear top end. This list is aimed specifically at the best microphone pre amps for a voice over studio.
As with all my articles, this is simply my opinion. Microphones, preamps, compressors, in fact all audio gear, are topics for hot debate. Even with expensive preamps there are fights over whether something sounds incredible or is just plain bad. That said, most of the recommendations here are backed by first hand experience, ideas from voice over studios, countless reviews and audio engineers I trust.
As most people are limited by budget I will start at the most affordable preamps and end up at the creme de la creme of voice over preamps.
Using an audio interface as voice over pre amp…
Before we dive into the best microphone preamps for voice over it’s worth chatting about using your audio interface as a preamp.
The short answer is that if you have a reasonable audio interface, yes the preamps should be fine, if not awesome. Especially as voice over is after a clean sound, a good interface will have you covered for most voice over jobs. I would recommend spending your cash on a great microphone before a preamp.
I discuss in another article the best audio interfaces for voice over. Any on that list would be fantastic and a great starting point for a home studio.
However, if you want to get serious here are the leading voice over pre amps:
Affordable Pre Amps
Focusrite ISA One
This is a beautiful pre amp and a great step up from the stock preamps in your interface. It gives you some real flexibility with your tone and is very easy to use. It comes as a self contained unit so it’s pretty portable if you travel a lot.
The Focusrite ISA 220 is also a great option, albeit a much more expensive option. That is the channel strip version of this preamp, and it also includes EQ and Compression. This can be a great way to go so that you have everything you need in one unit.
The ISA One is used in many voice over studios and would be an awesome purchase.
Grace Design M101
All Grace Design preamps are famous for their clean tone. They offer precise and mostly uncoloured tone, which is perfect for voice over. They are also a relatively affordable option if you are looking to upgrade your home studio set up.
If you are looking for a bit of colouration you might be better looking at a different unit, if it is exclusively for voice over – look no further.
This unit also comes in the 500 series, and they also have a channel strip with compression and EQ, which is fantastic.
A Design P1
This is another beautiful microphone preamp. It’s incredibly simple to use, as you can see from the image above. It adds a richness to your vocal, but is also very clean. The pre amp will give you a bit more colour than the other preamps in the list, but works really well for voice over. It’s always worth testing a unit like this before purchase. Some preamps work really well when paired with your microphone of choice, others fall flat.
This unit is part of the 500 series, which would mean you need an API 500 rack, or other form of external power. These usually cost around $450-650, but can be a great home studio purchase.
Expensive Microphone Pre amps for Voice Over
Avalon 737
A list of microphone preamps for voice over wouldn’t be complete without the Avalon VT-737sp. This is the pre amp is used by many of the best voice over studios.
It adds a beautiful warmth to the tone of your microphone, but is still very clean. Even cheaper or dull microphones come to life when run through the Avalon 737.
This unit also has a compressor and EQ, which are important for voice over. They can help to enhance microphones and also solve issues such as sibilance, or other harsh tones.
If you are getting SERIOUS then this could be the purchase for you.
If you are looking just for a preamp you could check out the younger brother of the 737 which is the Avalon M5. It’s a standalone unit and one of the best clean pre amps available.
Getting a great microphone preamp can bring your voice overs to life. The exciting thing about voice over is that once you have your setup you are sorted for years. For instance if you purchase a unit like the Avalon 737, paired with a nice microphone like the Neumann TL1 103 or U87, Sennheiser MK 416, AKG C414 or any other great voice over microphone – you will have an incredible, industry ready sound.


 The essential elements of a home voice over studio
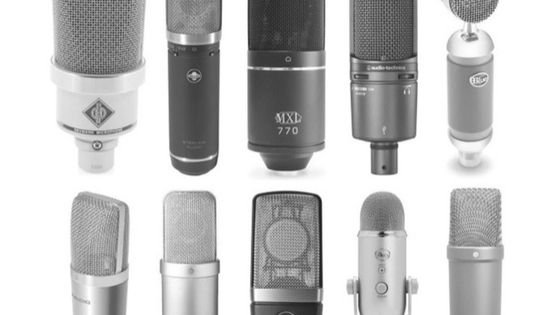 #4 Microphone
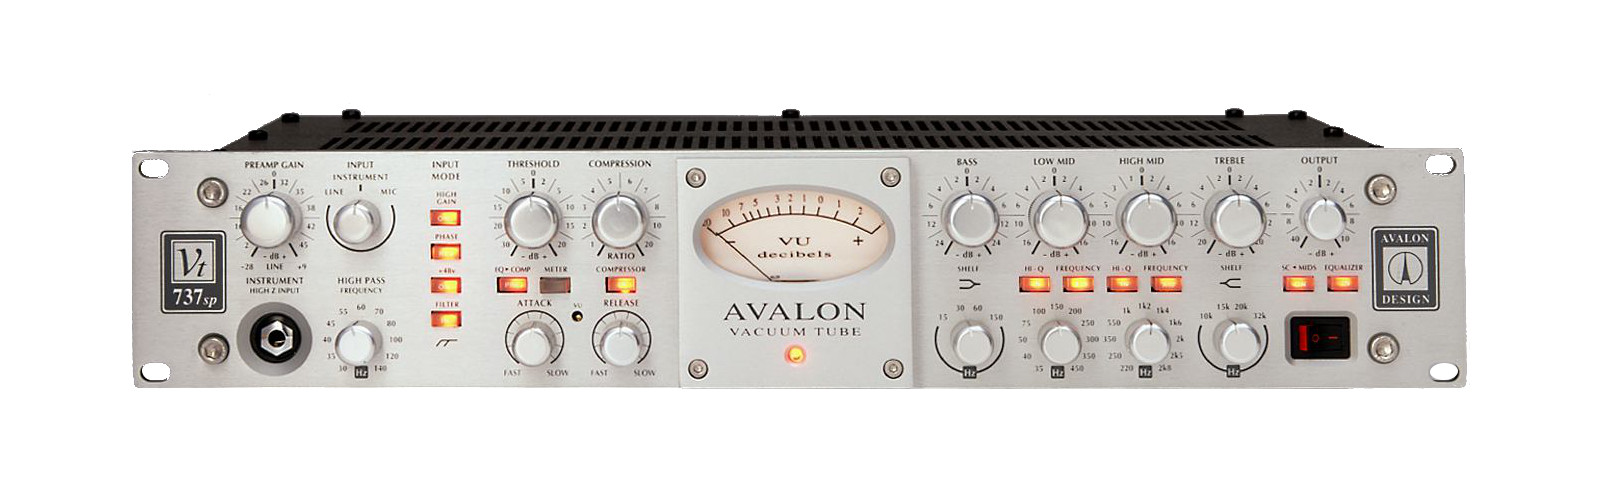

 Grace Design M101
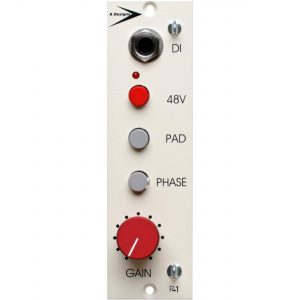
 Avalon 737